pinterest twitter instagram
Powered by Blogger.

Pages

  • home
  • fashion
  • lifestyle
  • beauty
  • travel
  • food
  • Disclaimer

Stephanie.


as most of you may not know, my fiance and i recently bought our first home!
so i have been completely wrapped up in that for the past few months and have really tried to get it organised and running exactly how i want it (which has been a mammoth task). i think i have finally reached a happy place with it and managed to find some time to get back on here and write a blog post!!

through the purchase and set up of our home, i have tried to be as eco and environmentally friendly as possible. especially through my purchases of kitchen, cleaning and bathroom items!
its definitely easy to get wrapped up in the convenience and availability of single use products when setting up your home; they seem to be the cheaper and less time consuming option.

i have picked a few of my stand out eco-friendly items that i highly recommend to everyone. they are all things that are easy to add into your lifestyle and help you do your part for the environment.

first up is my favourite change and purchase.
my Face Halo; i picked this one up after hearing about it from beauty guru Chloe Morello who is a part owner in the company. basically it eliminates the single use makeup wipe (which take 100 years to decompose!!!!). not only does using the face halo eliminate makeup wipes from your routine and day to day life but also the chemicals that come along with them!
the face halo uses halotech fiber technology and you literally JUST have to add water. it is the best thing i have ever purchased!!! super affordable too, its roughly 3 for $30AUD. they are super easy to clean, you just have to wash it with some soap (any soap) after each use then machine wash it every week-few weeks depending on how often you use it. you get up to 200 washes per face halo!!
i can't recommend this product enough - it truly works!
https://www.facehalo.com.au/

next up are two products that i use weekly and reduce a significant amount of plastic!!
they are my reusable produce and shopping bags. if you are like me and love food shopping then these are a must! not only are they convenient and money saving, they also really help the environment.

here in Australia, the supermarkets sell reusable plastic bags that you pay 10 cents for per bag and you are meant to bring them back and keep using etc. but i often find 1. you forget to bring them with you 2. they end up breaking after a few uses and 3. people just treat them as a single use throw away anyway.
so i decided i would purchase a set of reusable shopping bags and a set of produce bags when we moved in. (i can confirm i use them every week without fail).
the produce bags are exceptionally handy, i use them for all my fresh fruit and veggies and they can also be stored in the fridge if you can't be bothered emptying them when you get home.
the reusable shopping bags speak for themselves, they allow me to organise my shopping as i am walking around the store and are easy to transport to and from the car.

i also make sure i have fold up carry bags in my handbag at all times, so if i ever get stuck at the shops and need a bag i always have one!
https://www.biome.com.au/reusable-bags/2380-onya-weigh-reusable-fruit-veg-bags-set-of-5-9340655000477.html
https://packingsorted.com.au/

one of my favourite kitchen purchases are my food savers! i use them for tomatoes, onions and garlic that aren't being used. these are great because they eliminate the use of cling wrap or other single use plastic storage and keep my left over vegetables fresh.
they are perfect for when you only use half an onion or half a tomato or one clove of garlic and want somewhere to store the remainder. (although it isn't ideal that the food saver it self is plastic, it does last a long time and can be washed etc).
i definitely recommend these if you cook and want an alternative way to store your half used vegetables!
https://www.amazon.com.au/Hutzler-Classic-Food-Savers-Set/dp/B019Y6BWOI
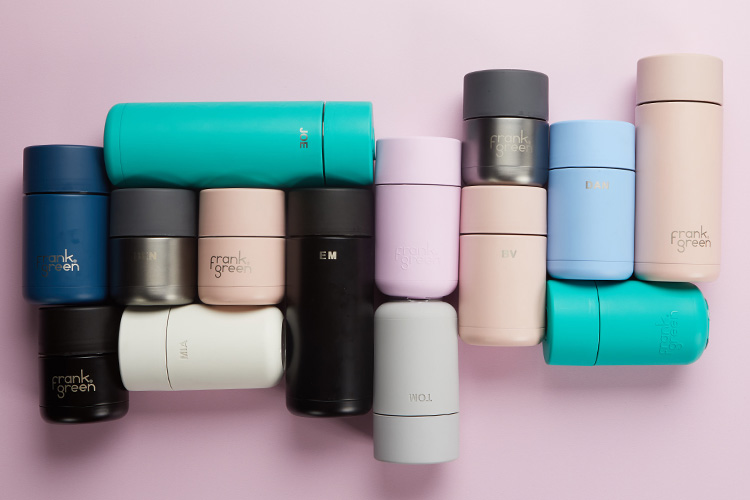
reusable coffee cups are something i have been using for years and swear by them! these days you can get so many different styles and designs; it would be hard to find something you didn't like. i have been loving the Frank Green cups, i have both the original and stainless steel version and they are by far my favourite reusable cups!
i generally use mine for when i am leaving the house, i will take a coffee from home and it always stays warm for my journey. i also like to pack my small sized one in my bag for when i feel like a coffee when i am out. they really do help with eliminating landfill and can be used for so many other beverages aside from coffee!
https://frankgreen.com.au/


lastly but not least, is another reusable beverage item - a stainless steel drink bottle. like the coffee cups, you can also get these in a range of styles, designs and sizes. i particularly like the ones by Swell and from Kikki K (which i am currently using). the good thing about a stainless steel drink bottle is that you have the option of carrying both hot and cold beverages. they are perfect for summer when you want cold water that will stay cold all day or for winter when you prefer to take a tea with you.  these also really do reduce the rate of plastics entering our oceans and landfill and would literally last you years without replacement.
https://www.swellbottle.com/
https://www.kikki-k.com/au/shop-by/category/reusables/stainless-steel-drink-bottle-woodland-11222601.html?cgid=shop_by-category-reusables#start=4

so these are just a few of my favourite eco friendly things i have incorporated into my new home. i hope i have inspired you to make some changes in your home too. if every one of us started to do even one of these things every day or week, we would really make a difference.
i have put a link to each of the products i use.

hope you have all been well
thanks so much for coming back :)
stephanie xxx
August 30, 2019 No comments
Day 8 


it is pretty much an Australian tradition to have a pavlova on Christmas day. we normally have a full sized round one however after having mini ones on the cruise, i decided to make mini ones this Christmas.

i have take inspiration from Natasha's Kitchen and her Pavlova recipe and all credit to her because her recipe is amazing and works a treat!


Prep: 20 minutes  Cook Time: 1 hour and 45 minutes  Makes: 15 Pavlovas

Ingredients:
- 6 egg whites, room temperature 
- 1.5 cups white sugar
- 2 tsp corn flour
- 1/2 Tbsp lemon juice
- 1/2 Tbsp vanilla extract


Ingredients for topping:
- 1 1/2 cups cold heavy whipping cream
- 2 Tbsp white sugar
- 4-5 cups fresh fruit (blueberries, kiwi, raspberries, sliced strawberries, etc)

Method: 
Prep: Preheat the Oven to 107 degrees (celcius) with the rack in the center of the oven. Line a large baking tray with baking paper. (if using large tray, you can fit them all on one tray, otherwise, bake on 2 separate baking tray in the top and bottom third of your oven) **not fan forced**
1. Using your mixer (kitchen aid), beat 6 egg whites on high speed 1 minute until soft peaks form. With mixer on, gradually add 1 1/2 cups sugar and beat for 10 minutes on high speed, or until stiff peaks form. The mixture will be smooth and glossy.

2. Use a spatula to quickly fold in 1/2 Tbsp lemon juice and 1/2 Tbsp vanilla extract, then fold in 2 tsp corn starch and mix until well blended.

3. Pipe meringue onto the baking paper using a 1m piping tip. Indent the center with a spoon to allow room for cream. 

4. Bake at 107 degrees (celcius) for 1 hour and 15 minutes then turn oven off and without opening the door, let meringue in the hot oven another 30 minutes. The outside will be dry and crisp to the tap and very pale cream colored (almost white) and the inside will still be marshmallow soft.

5. Transfer the pavlova with the parchment paper onto the counter or a cookie rack and allow it to cool to room temp. Once cool, you can top them with whipped cream and fruit or store in an airtight container (or plastic bag) for 3-5 days at room temperature.
Decorating:
1. Beat cold heavy whipping cream with 2 Tbsp sugar in the cold bowl for 2 to 2 1/2 minutes or until whipped and spreadable.

2. Pipe frosting onto the pavlova and top with fresh fruit. Once they are assembled they stay great for up to 4 hours at room temperature.


i hope you enjoy these Mini Pavlova Treats inspired by the lovely Natasha's Kitchen. all recipe credit goes to her! i really enjoyed making these yummy treats, they are perfect for our hot Australian Christmas. i would to see your version, so please send me some pictures!!

xxx
instagram: @lifebyssblog
email: lifebyssblog@gmail.com
December 20, 2018 No comments
Day 3


there is nothing quite like Christmas baking!

Christmas is definitely my favourite time of the year to bake some goodies and share them amongst friends and family.

shortbread is something i have been making since i was a little kid, mum and i would cut the shortbread into Christmas shapes and decorate them with green and red icing.
i decided this year i wanted to recreate my childhood shortbread cookies and share it with you.

Christmas Shortbread
Prep: 2 hours      Cook: 20 minutes      Makes: 20 cookies (depending on cutter size)

Ingredients
200g unsalted butter (chopped)
1/2 cup Caster Sugar
1/2 cup Rice Flour
1 1/2 cup Plain Flour
2 teaspoons Vanilla Extract
**whatever you choose to decorate with** (i chose Dr Oetker designer icing in white and some icing sugar)

Method
Step 1 - Process butter, sugar, flours and vanilla in the bowl of a food processor, stopping and scraping down sides with a spatula, if needed, until dough just comes together. Turn out onto a lightly floured surface. Knead gently to combine.
Step 2 - Divide dough in half. Shape into discs. Wrap in plastic wrap. Refrigerate for 30 minutes or until just firm.
Step 3 -  Preheat oven to 170C/150C fan-forced. Grease 2-3 large baking trays. Line with baking paper.
Step 4 -  Roll out 1 portion of dough between 2 sheets of baking paper until 3mm thick. Using your preferred cookie cutter, cut 8 cookies from dough. Repeat with cookie cutter, re-rolling and cutting dough trimmings. Place cookie shapes, 2cm apart, on 2 prepared trays.
Step 5 - Bake, 1 tray at a time, for 10 minutes or until just firm to touch, but not browned. Leave cookies to stand on tray for 10 minutes. Transfer to a wire rack to cool completely.
Step 6 - once completely cooled, decorate as you wish. (i chose to decorate with some pre-made icing by Dr Oetker and some Christmas themed sprinkles) 

i really enjoyed baking these Christmas treats and hope you will too, send me some pics of your creations if you end up using this recipe :)

**sorry they are decorated so terribly i had to rush them**

xxx
instagram: @lifebyssblog
email: lifebyssblog@gmail.com

December 15, 2018 No comments

CARAMEL SLICE 
makes roughly 30 pieces

i have been obsessed with this caramel slice lately!! it is SOOO yummy and so easy to make. it is originally my boyfriends grandma's recipe and we only ever use to eat it on special occasions but i would constantly crave it so i had to ask her for the recipe. these are just one of those sweets that when you start eating them you can't stop so luckily the recipe makes quite a few slices 😂

i hope you enjoy this sweet treat as much as i do.

Ingredients: 
60g Butter
1/4 cup Golden Syrup
200g tube of condensed milk
250g packet of milk arrowroot biscuits (any sweet biscuit), crushed
50g slivered almonds
250g block Cadbury Dairy Milk (or any block of your choice) 

Method:
step 1. in a large microwave-proof bowl melt the butter, golden syrup and condensed milk on high (100% power) for 1-1 1/2 minutes. Stir well. if there are still chunks of butter just keep stirring it and they will melt down as your are stirring the mixture. 
step 2. crush biscuits in a food processor or by hand (if not done already). i like to add the almonds in aswell so they are also crushed. 
step 3. thoroughly stir in the biscuit crumbs and almonds.
step 4. press into a 28 x 18cm slab pan (any size slab pan you have around this size will do). i tend to have to use my hands for this part to make sure its all spread and pressed evenly.
step 5. roughly chop the chocolate and melt in the microwave on low heat in 15-30 second bursts for approximately 2 minutes or until melted. 
step 6. spread the melted chocolate over the crumb mixture and place in the fridge to set. after half an hour or so, take out and cut into desired pieces then place back into the fridge to set further. if you leave it too long in the fridge it is impossible to cut into pieces. 

please make sure you share me with your thoughts if you make them!!
sorry there aren't any photos of the 'making' process i couldn't get any good ones but i figured it is a pretty straight forward recipe so it should be okay!!
xxx
instagram: @lifebyssblog
email: lifebyssblog@gmail.com


August 12, 2018 1 comments

DAY 11

i felt like today deserved two posts considering that they are both pretty short posts and its Christmas eve eve!! i can't believe there is only 1 day to go and that 12 days went so quickly!!

so i thought two days out is the perfect time to share with my last minute Christmas treat 'recipe' for Reindeer biscuits. these are super easy to make and if you have kids also super fun for them to get involved with!

Reindeer Biscuits 

What you will need:
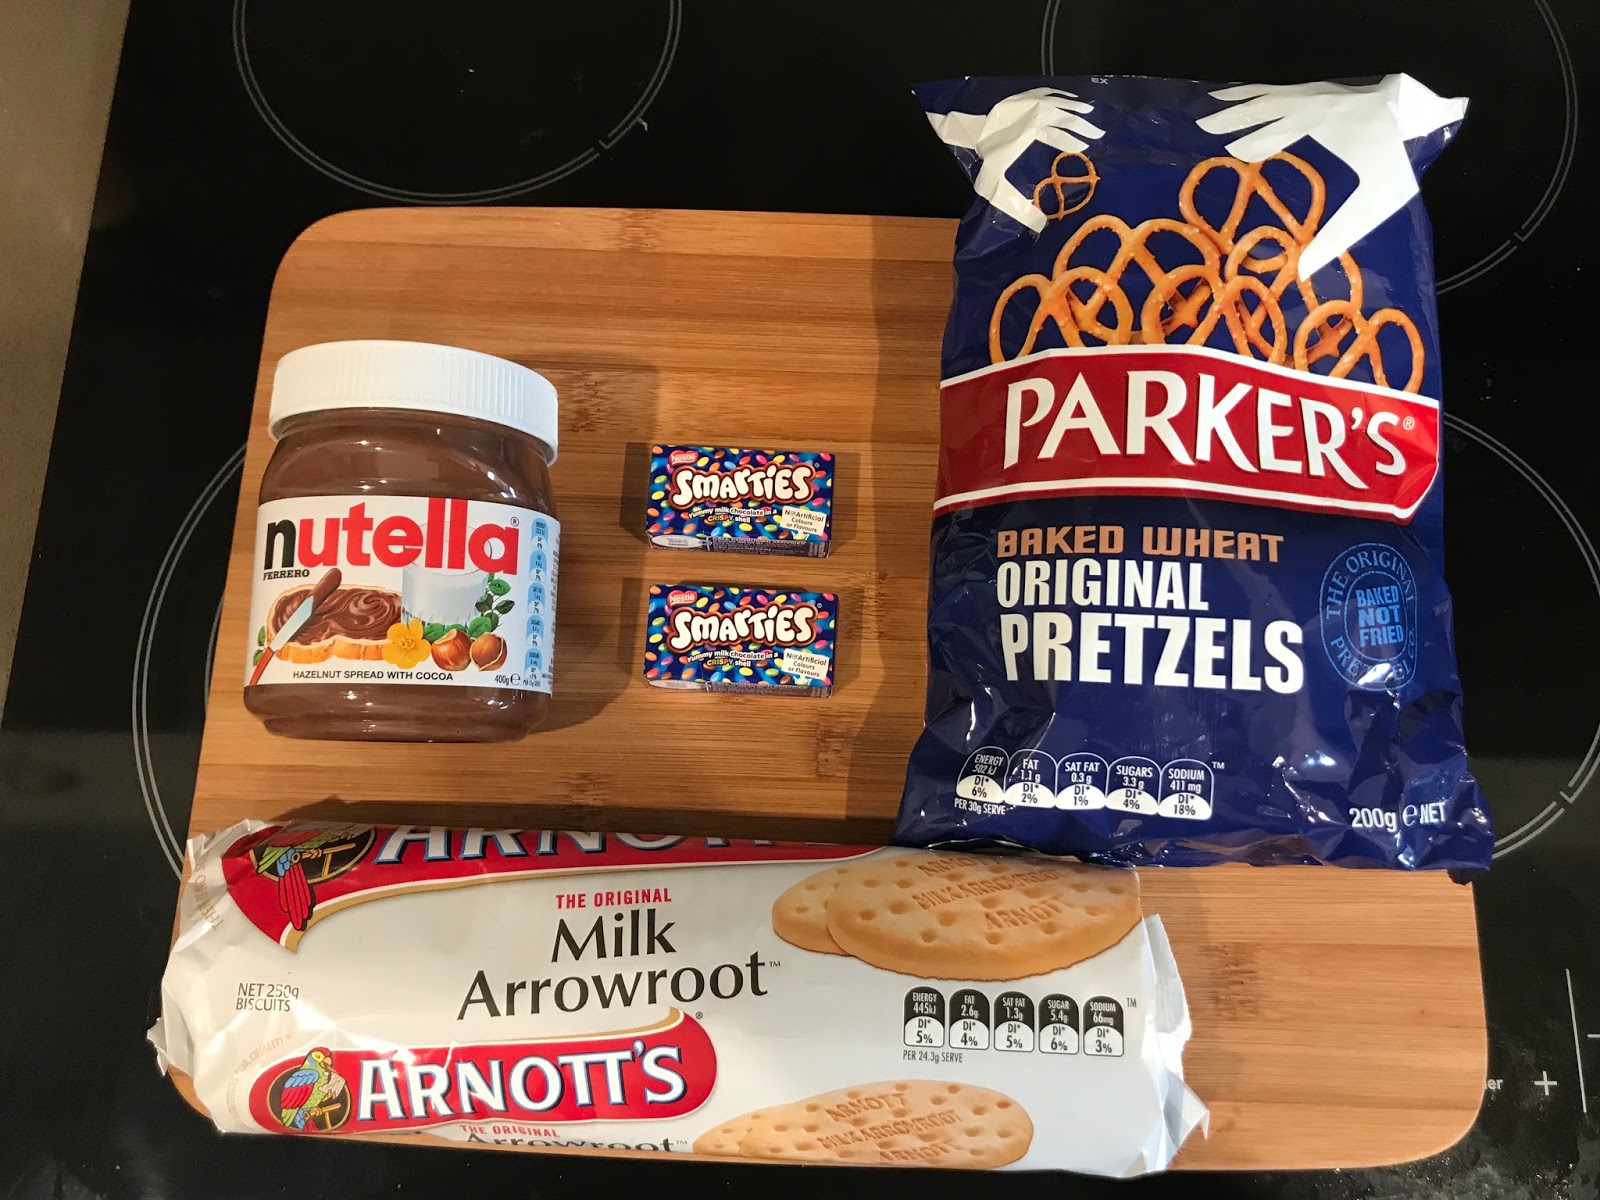
- Arnott's Milk Arrowroot Biscuits (1 packet) 
- Nutella Spread (or melted chocolate or anything spreadable of your choice) 
- Pretzels
- Smarties or M&Ms
- anything else you want to decorate the face 

What to do:
- lay biscuits flat on a tray or flat surface
- spread nutella (or chocolate) over the biscuits covering the whole surface. you can do this as thick or as thin as you like
- place a smartie as a nose
- snap pretzel in half and place as two antlers
- place in fridge or leave to harden at room temperature. i like the nutella to be a little set but if you can easily enjoy them straight away!


i hope you enjoy 

Merry Christmas
xxx

December 23, 2017 No comments

DAY 4

Day 4 is all about Christmas baking. it is always nice to make treats over Christmas (even though i really don't need them). this year i am making Gingerbread, surprisingly i have never made Gingerbread before but i am going to give it a go.


Gingerbread

What you will need:
- Melted Butter, to grease
- 125g Butter, at room temperature
- 100g (1/2 cup, firmly packed) Brown Sugar
- 125ml (1/2 cup) Golden Syrup
- 1 Egg, separated
- 375g (2 1/2 cups) Plain Flour
- 1 tablespoon Ground Ginger
- 1 teaspoon Mixed Spice
- 1 teaspoon Bicarbonate of Soda
- Plain flour to dust
- 150g (1 cup) Pure Icing Sugar, sifted
- 8-10 drops red liquid food colouring
- 8-10 drops green liquid food colouring
- Smarties or M&Ms to decorate

Method: 

Step 1
Preheat oven to 180°C. Brush 2 baking trays with melted butter to lightly grease.

Step 2
Use an electric beater to beat the butter and sugar in a bowl until pale and creamy. Add the golden syrup and egg yolk and beat until combined. Stir in the flour, ginger, mixed spice and bicarbonate of soda. Turn onto a lightly floured surface and knead until smooth. Press dough into a disc. Cover with plastic wrap and place in the fridge for 30 minutes to rest.

Step 3
Meanwhile, place egg white in a clean, dry bowl. Use an electric beater to beat until soft peaks form. Gradually add icing sugar and beat until stiff peaks form. Divide icing among 3 bowls. Cover 1 bowl with plastic wrap and place in the fridge. Add red colouring to 1 bowl and stir until combined. Add green colouring to remaining bowl and stir until combined. Cover with plastic wrap and place in the fridge. this part is optional: i used just white icing and am using red and green m&ms to decorate

Step 4
Place the dough between 2 sheets of baking paper and roll out until about 4mm thick. Use a 9cm gingerbread man cutter to cut out shapes. Place on trays about 3cm apart. Repeat with any excess dough. any Christmas shapes/size cutters will work

Step 5
Bake in oven for 10 minutes or until brown. Remove from oven. Transfer to a rack to cool.


Step 6
Place prepared icings in small plastic bags. Cut a small hole in a corner of each bag. Pipe icing over gingerbread men to decorate. Finish with Smarties.

Notes: 
Allow 30 minutes rest time


December 16, 2017 No comments

i have decided to *potentially* start a series of blog posts called "Baking Sundays", this is where ill hopefully be able to share with you what i bake (if they turn out that is)

I have always enjoyed baking and cooking in general but have always been the one out of my siblings to bake even when we were younger, maybe its because i have such a sweet tooth.

This blog post will focus on cookies and crunchie cheesecake.

...and so we begin.
"subway" cookies 

if you are like me and love subway cookies, then you will also be dying to know how to make them from home.

i picked up this recipe from my local radio station here in Adelaide's facebook page so i am not sure who the original author is but all credit to them.

i am a sucker for white chocolate and macadamia cookies and of course M&M cookies so they are the two featured in this blog post.

***please note, i wasn't completely successful at this recipe and im not sure why, they tasted delicious however out of the 3 trays i had in the oven 1 burnt, 1 cooked perfectly and the other could of done with a little longer then 7 minutes (see photos for what i mean, i ditched the burnt ones). I'm not sure if i should've rotated them during the 7 minutes or had less in the oven. I also found that the longer you let the mixture sit the sticker and thicker it became making it easier to place them on the tray as described. BUT please don't let this deter you from the recipe they still tasted good, i would still give it ago and see if it turns out better then me***

Makes: 24  Prep time: 10 Minutes  Cook time: 7 minutes


Ingredients:
- 1x packet of cake/brownie mix (whatever flavour/brand you want- i am using vanilla)
- 2x eggs
- 1/3 cup of vegetable oil
- optional ingredients; milk choc chips, white choc chips, macadamias, m&m etc

Recipe (super easy):
1.  Preheat oven to 200 degrees Celsius or 392 Fahrenheit
2.  Pop everything into a large bowl or kitchen aid and mix together with an electric or hand mix until fully combined
3. Roll the dough into small balls and place onto a lined baking tray (they will get bigger so don't put too many on a tray [maybe 12 per tray] otherwise they will run into eachother)
4. Pop them into the oven for approximately 7 minutes. (they won't seem ready when you pull them out however they will continue to harden as they cool but don't worry they will still be soft like a subway cookie on the inside)


Crunchie No-Bake Cheesecake 


all credit for this recipe goes to the wonderful Jane's Patisserie, she makes some pretty spectacular cheesecakes so please go and check her out!! Here is the link to her original recipe: http://www.janespatisserie.com/2015/10/09/no-bake-honeycomb-crunchie-cheesecake/

i found Jane's recipe on twitter actually through someone who retweeted it and i just had to make it. before making this cheesecake i had actually never made a cheesecake from scratch myself so i was excited to see how i would go and how it would turn out. AND let me tell you it tasted amazing !!!! my boyfriend has already asked me to make another. 

Not only was the cheesecake super tasty but also soooo easy to make. 

NOTE: i did add/change a few things to Jane's recipe so they will be highlighted throughout)

Serves: 12 (depending on your slices)
Ingredients:
Biscuit Base
– 300g Digestives
– 150g Unsalted Butter/Stork, Melted

Cheesecake Filling
– 500-600g Full Fat Cream Cheese
– 125g Icing Sugar
– 1tsp Vanilla Extract
– 300ml Double Cream
– 250g Milk Chocolate, chopped
– 200g-250g Crunchies, chopped – (2×4 multipack = 260g)
– 200g Crunchie Spread
– 50g Chocolate, melted
– 150ml Double Cream
– 2tbsps Icing Sugar
– 3 Crunchies, chopped into 12 pieces
– 1 Crunchie, chopped finely
– 500-600g Full Fat Cream Cheese
– 125g Icing Sugar
– 1tsp Vanilla Extract
– 300ml Double Cream
– 250g Milk Chocolate, chopped
– 200g-250g Crunchies, chopped – (2×4 multipack = 260g)


To Decorate  (NOTE: i didn't use the double cream, crunchie spread or icing sugar on my cake as i don't like cream and we don't have crunchie spread here in AUS but totally up to you how decorated)
– 200g Crunchie Spread
– 50g Chocolate, melted
– 150ml Double Cream
– 2tbsps Icing Sugar
– 3 Crunchies, chopped into 12 pieces
– 1 Crunchie, chopped finely


Method: i decided instead of rewritting the whole method, i would add in what i did differently/ what i choose to do whilst still giving for credit Jane. 
1) To make the Cheesecake Base – melt the butter in the microwave on short bursts (i used mircowave) or in a small pan over a medium heat – Blitz the biscuits in a food processor to a small crumb, add the melted butter, and pulse a few times until it is combined well. Tip into a 8″/20cm Deep Springform Tin and press down firmly – chill in the refrigerator whilst you do the rest!
2) To make the Cheesecake Filling – Melt the chocolate in a bowl over a pan of gently simmering water, stirring gently (i melted this way as i find mircowave generally burn my chocolate) or microwave in short bursts until fully melted – leave to cool slightly whilst doing the rest.
3) With an electric mixer (I used my KitchenAid) Whisk the Cream Cheese and Icing sugar until combined – pour in the liquid double cream and continue to Whip the Cream Cheese/Cream Mixture until it is starting to thicken a lot like a Mousse does (I use speed 6/10 on my KitchenAid) i added the vanilla extract here, as there was no mention in Jane's method as to where to add it.
4) Whilst mixing, pour in the melted chocolate and Whip again until thick – It will hold it self completely when finished whipping – It won’t take too long as the chocolate will harden quickly and cause it to thicken.
5) Chop up the second bunch of Crunchies and fold through the mixture (i was confused at this part as when was i suppose the first bunch of crunchies so i just put them all in here, although i had some left over so i do feel like i could have used  more) – Pour the mix on to the biscuit base, smooth over, cover, and chill in the fridge for at least 5-6 hours hours or preferably overnight.
6) To decorate the Cheesecake – Remove the cheesecake from the tin, and decorate with some whipped cream, even more crushed Crunchies, and some melted chocolate! i melted some chocolate here and swirled it over the top of the cheesecake i also got out the cheese grater and grated some crunchie and chocolate all over the top to give it more taste (you could even do this before you chuck it in the fridge to set). then just chopped up some crunchies and placed them over the cake. 
NOTE
If it looks like your cheesecake isn’t setting, or its a but sloppy, or you’re even not sure.. try it anyway. Try to set the mix anyway! If it still doesn’t set, freeze it and have an Ice Cream Cheesecake! ( i definitely didn't have this issue, mine was thick enough but i think make sure you use double cream instead of thick cream)
all credit to http://www.janespatisserie.com/ definitely check out her blog and youtube!!


i hope you enjoyed this blog post and these yummy treats, i sure did. i am going to try and use the same recipe but make a snickers cheesecake next time and see how i go!
Enjoy xx
August 13, 2017 No comments
Older Posts

About me

About Me

stephanie. blogger. food. beauty. lifestyle. fashion. travel.

Pages

  • Home
  • Disclaimer
  • fashion
  • lifestyle
  • beauty
  • travel
  • food

socials

Labels

beauty fashion food lifestyle travel

Blog Archive

  • ▼  2019 (3)
    • ▼  August (1)
      • how i am being environmentally conscious in my home
    • ►  May (1)
    • ►  February (1)
  • ►  2018 (34)
    • ►  December (13)
    • ►  November (2)
    • ►  October (3)
    • ►  September (2)
    • ►  August (1)
    • ►  July (2)
    • ►  June (1)
    • ►  May (4)
    • ►  March (1)
    • ►  February (4)
    • ►  January (1)
  • ►  2017 (28)
    • ►  December (14)
    • ►  November (1)
    • ►  October (3)
    • ►  September (3)
    • ►  August (3)
    • ►  July (1)
    • ►  June (3)

Contact

Name

Email *

Message *

Theme By

FOLLOW ME @stephanie.s.blog

Created with by ThemeXpose